Posted on Leave a comment

Laundry Soap Part 2- Pictures!

After my last post, I was asked about trying to put up some pictures of our laundry soap making process.  As some of you know, I am not the most tech savvy person in my household nor am I the best photographer so it took longer than I really would like to admit to make this cooperate.  Please forgive my shortcomings as I attempt to show how we mix up our dry laundry soap batches.  As mentioned before, I take a fairly young soap and shred it.  It sits overnight (sometimes up to 2 days) to dry a little on the rack and then I take over a kitchen counter.
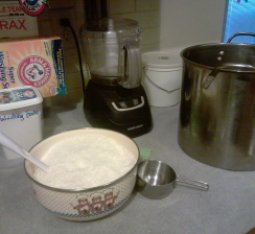
Making dry laundry soap

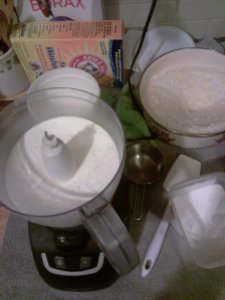
The bowl in front has shredded soap and behind it to the left is the washing soda and borax that we add to ours.  (Like our recycled washing soda container there- reduce, reuse, recycle, right?)  That food processor was a great buy that is still kicking after all the abuse it has received.  To the right is my favorite soaping pot with a plastic storage tub behind it.  I prefer towels under my workspace for something like this because it is so easy to clean up after!

Into the mixer goes one cup each of the soap shreds, washing soda, and borax.  I give it a few spins to mix and add in any fragrances we might want at that time.  Sometimes we use none at all, but our favorite is a clean laundry scent.  Go figure, huh?  If you are creating this at home, I will pass the same warning to you as my teacher gave me: let the bowl sit for a minute before you pop open the top!  As you mix these in the mixer, they will give off some powdery residue that you really, really don’t want to breathe or spread around your workspace.  Once the dust settles, the mix is ready to go into the big soap pot.

Dry laundry soap mixed up

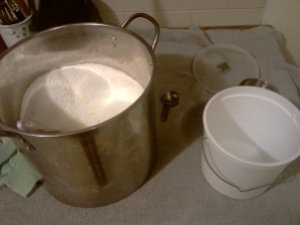
After all of the shredded soap has been mixed up and everything has been poured into the big soap pot, I usually will give one or two more stirs in the pot just to make sure all is combined.  We will also adjust the scent as needed.  After it passes inspection all that is left is to place it into buckets for storage.  In this run, I made about three buckets full and we should be set on laundry soap for awhile.  It really does only take about one scoop for our laundry.

Laundry soap into the pot

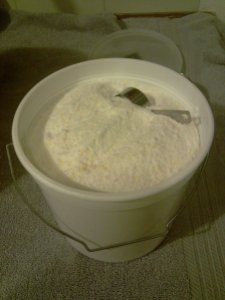
The scoop in the picture below is just a regular coffe scooper- you might find them in your local dollar stores.  I got mine there over two years ago.  My soap teacher found these buckets in Home Depot and they have been the best for laundry soaps!  (Anna, have I told you lately you rock?)  That faded green thing in the pictures?  I confess that I still prefer to hand shred my soaps and I wear my old gardening glove while doing it so I don’t take off any more chucks of my thumb while I’m rocking out.  Shredding soap is great for thinking time but can be hazardous if you’re not careful or dancing around too much.  Time involved?  Not counting the shredding soap part, you can whip this up and clean the room back within an hour for a batch like this.  Want to try but don’t want to worry about shredding the soap?  We regularly make the laundry soap bases and sell it shredded for you.  You only have to decide which soap base to play with in your kitchen.

Finished laundry soap

Hope you enjoyed my little attempt at pictures here and that it might make you realize just how easy it can be.  Feel free to shoot me any questions you have and I’ll try to answer here on the blog or to your email directly.  Don’t forget you can find our little Facebook page too and catch us there!

Happy Washing!

Dorothy
Posted on Leave a comment

Laundry soap and an apology

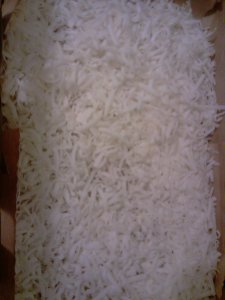
Laundry Soap Shreds
Shredded soap for homemade laundry soap

I admit I’ve been pretty quiet here on the blog lately and felt I owed an apology and explanation.  I haven’t dropped off the face of the planet- promise!  Summer gets pretty crazy around here between soaping, brainstorming with customers for fall gift projects, playing with a new soaping oil, and the youngsters off of school.  Please forgive me for the less frequent postings in these summer months but I’m hoping that we’ll all be happy with the pay off here soon!  We’ve got quite a few varieties working their way off the curing racks and some great ideas for the soaps to be whipped up next.  Yes, Herbert, even another round of beer soap with your name on it!

I’ve been asked a few times about how we make our laundry soap around here so I’m hoping to make someone’s day today.  Ours is pretty simple and you are welcome to whip up some of your own!  I just checked on my soap shreds again so I could snap a picture or two for you and placed them back onto the drying racks.  They should be ready to mix up by tomorrow.

I start by making a plain 100% coconut or lard soap, depending on what I’m looking for in the final mix.  After it has been soaped up and molded for 24 hours, I pop the soap out of the mold and cut it into large bars.  The bars rest for anywhere from 24 hours to three days before I shred them down.  I find the younger the soap, the easier it shreds.  These shreds go back on the rack for one to three days to dry out a bit more.  Once they’re where I want them, they get tossed into the soaping mixer and go for a quick spin.   (I learned from personal experience to keep a separate blender and mixer for soap stuff- soap still doesn’t taste good!)  The soap shreds get washing soda and borax mixed in; that’s it, unless you add a little fragrance when mixing it all together.  Everything gets placed into a bucket that sits on the washing machine.  How easy can you get, right?  It only takes us about a teaspoon to tablespoon to wash up our clothes- even the very muddy ones my kids have brought to me lately.  Do you have a favorite way to make your laundry soap or have you even tried before?  It was kind of intimidating at first, like soapmaking, but it’s a lot of fun!

Happy Washing!

Dorothy

Posted on Leave a comment

Back to work after day camp

Luckily, I’m better with soaping than I am with a drill press or hammer.  I’ve mentioned before that I can be hazardous to my own health with some power tools and I managed to prove it without a doubt.  In my amazing display of talent, I managed to beat up myself enough to need a few band aids over the two weeks, injure half of my fingers, but not teach any Cub Scouts bad words 🙂  We had to take a small hiatus to let my thumbs heal up enough from working at day camp but it was full steam ahead this week!

All the racks are full again and the kitchen smells great.  There had been requests for more Sage & Citrus and Rain so we got both of those poured and cut.  Both batches are still color morphing as of today so I’m curious just what color they will be when done.  I took some initial pictures and will post them with the final results.  Cold process soap making is notorious for bringing a little excitement to the color schemes and not always following your best laid plans.  My impatience also might have ruined one Oatmeal, Milk, & Honey batch but I’m still contemplating rebatching it so I’ll save that whole fiasco for us all to have a good laugh on a Friday .  We also made more laundry soap base this week and should be shredding it by this weekend.  All in all, it’s been great getting back to work!

Currently in stock and ready to ship are our Chocolate, Ginger Peach, Vegan Beer Soap, and the Shea Butter Sage & Citrus.  These new batches that we whipped up this week won’t be ready to leave us until mid-July.  Preorders are still available for some of them though so drop us a line if there is one you want held for you!  We are also waiting on a shipment of some of our favorite scents so there should be another round of soapmaking very soon in my future- woohoo!  Now I must run as the giant mud puddle out back somehow lured my children into it and they are in serious need of some soap.  Hope your neck of the woods gets some of this much needed rain too!

Happy Washing to you all!

Dorothy