Posted on Leave a comment

Mad Scientist’s Stock Update

Well, the racks are all overflowing again with new soaps and the stick blender has begged for mercy.  All possible soaping pots came out for work this week and I was caught cackling and dancing more than once over a bubbling stock pot.  Love my job!  Most of this week’s soaps were heavily olive oil based so expect them to be very mild, smooth, and creamy when you get your hands on them!  Thanks again to cute Baby Lex for inspiring some new soaps.

As promised, here is the in-stock update.  The website is still in progress (one of the hazards of being a chronic do-it-yourself-er who has a habit of researching things almost to death) so I apologize that we haven’t gotten a shopping cart set up yet or launched the site.  If required, I’ll go stand in the corner once I finish this post 🙂  All bar soaps are currently priced at $4.25 each, plus any shipping costs or sales tax if you are in Texas.  If you are local to the Cypress, TX area, we can be caught at Donna’s Market in October or arrange a pickup to save you shipping costs.  All others can order by emailing us directly at txpioneercreations@yahoo.com or contacting us thru this blog and Facebook.  And yes, we can always create a gift set for you- just drop us a line and let’s brainstorm!

Ready to ship/pick up:  Chocolate (both Vegan and Old Fashioned), Sage & Citrus with Shea Butter, Rain, and our regular Sage & Citrus.

Ready by Sept 30th (currently preorder only):  Moroccan Mint, Indonesian Teakwood, Unscented Olive Oil, a vegan Sage and Citrus , and a vegan Oatmeal, Milk, and Honey Scrub Bar.  The Green Tea Sand Scrub will also be ready by then but was made in oversized bars so they have a separate price of $5.25 each.

Samples:  Ginger Peach Tea, Texas Suds (the beer soap), Vanilla, Chocolate (both kinds), Olive Oil, and Moroccan Mint are currently ready to go home with someone.  We will have a few of the Moroccan Mint, Unscented Olive Oil, Indonesian Teakwood, and the Oatmeal, Milk, and Honey Scrub at the end of September also.

I do get the question about letting people have soaps before they are done “curing”, also known around here as “their month on the rack.”  The short answer is no, we can not let you have any cold processed soaps until they are done.  They need that time to mellow out and we need some time to make sure they pass our quality control testing.  Yes, we check our soaps by the batch, even if it’s a recipe I’ve made so often I can make it in my sleep.  Never know when a scale will be off in measuring or the mad scientist soaper will get so into the song playing that she forgets to add the fragrance so we make it a policy to double check each batch.  Please help me practice being patient and I will gladly keep you updated on your soaps.

Also asked is about our samples since we don’t always have samples on hand for every soap on display.  There are a few reasons for that.  First, there are only a limited amount of samples so when they’re gone, they’re gone.  I don’t make soap specifically for samples; they come from any extras leftover from the larger batch.  It is one way I have found to help keep our costs down which allows us to keep our prices lower for you.  Secondly, Texas considers samples to be sales taxable which means we have to decide between charging customers for them or we pay it.  Currently, we do not charge anything for samples and we try to include a few samples with shipments whenever possible.  If you are interested in having only samples mailed directly to you, please contact me directly so we can find a cost-effective way for both of us.  I realize that not everyone is interested in the motives behind why a company charges for things, but I believe some are and I try to be completely honest about how we calculate the prices as we do.

Over the next few weeks, I will post some of the pictures of the new soaps along with information about each so everyone can see.  Hope all of you have a great weekend in your neck of the woods and I will now step out to clean out my cauldron for the last time this week.  Oh yeah, then I guess I might be off to stand in the corner for not finishing our website……

Happy Washing!

Dorothy
Posted on Leave a comment

Laundry Soap Part 2- Pictures!

After my last post, I was asked about trying to put up some pictures of our laundry soap making process.  As some of you know, I am not the most tech savvy person in my household nor am I the best photographer so it took longer than I really would like to admit to make this cooperate.  Please forgive my shortcomings as I attempt to show how we mix up our dry laundry soap batches.  As mentioned before, I take a fairly young soap and shred it.  It sits overnight (sometimes up to 2 days) to dry a little on the rack and then I take over a kitchen counter.

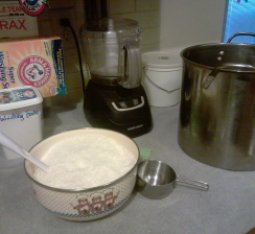
Making dry laundry soap

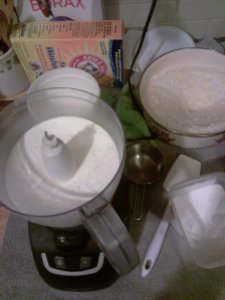
The bowl in front has shredded soap and behind it to the left is the washing soda and borax that we add to ours.  (Like our recycled washing soda container there- reduce, reuse, recycle, right?)  That food processor was a great buy that is still kicking after all the abuse it has received.  To the right is my favorite soaping pot with a plastic storage tub behind it.  I prefer towels under my workspace for something like this because it is so easy to clean up after!

Into the mixer goes one cup each of the soap shreds, washing soda, and borax.  I give it a few spins to mix and add in any fragrances we might want at that time.  Sometimes we use none at all, but our favorite is a clean laundry scent.  Go figure, huh?  If you are creating this at home, I will pass the same warning to you as my teacher gave me: let the bowl sit for a minute before you pop open the top!  As you mix these in the mixer, they will give off some powdery residue that you really, really don’t want to breathe or spread around your workspace.  Once the dust settles, the mix is ready to go into the big soap pot.

Dry laundry soap mixed up

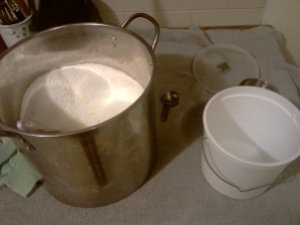
After all of the shredded soap has been mixed up and everything has been poured into the big soap pot, I usually will give one or two more stirs in the pot just to make sure all is combined.  We will also adjust the scent as needed.  After it passes inspection all that is left is to place it into buckets for storage.  In this run, I made about three buckets full and we should be set on laundry soap for awhile.  It really does only take about one scoop for our laundry.

Laundry soap into the pot

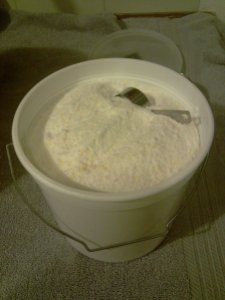
The scoop in the picture below is just a regular coffe scooper- you might find them in your local dollar stores.  I got mine there over two years ago.  My soap teacher found these buckets in Home Depot and they have been the best for laundry soaps!  (Anna, have I told you lately you rock?)  That faded green thing in the pictures?  I confess that I still prefer to hand shred my soaps and I wear my old gardening glove while doing it so I don’t take off any more chucks of my thumb while I’m rocking out.  Shredding soap is great for thinking time but can be hazardous if you’re not careful or dancing around too much.  Time involved?  Not counting the shredding soap part, you can whip this up and clean the room back within an hour for a batch like this.  Want to try but don’t want to worry about shredding the soap?  We regularly make the laundry soap bases and sell it shredded for you.  You only have to decide which soap base to play with in your kitchen.

Finished laundry soap

Hope you enjoyed my little attempt at pictures here and that it might make you realize just how easy it can be.  Feel free to shoot me any questions you have and I’ll try to answer here on the blog or to your email directly.  Don’t forget you can find our little Facebook page too and catch us there!

Happy Washing!

Dorothy

Posted on Leave a comment

Laundry soap and an apology

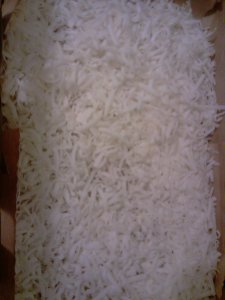
Laundry Soap Shreds
Shredded soap for homemade laundry soap

I admit I’ve been pretty quiet here on the blog lately and felt I owed an apology and explanation.  I haven’t dropped off the face of the planet- promise!  Summer gets pretty crazy around here between soaping, brainstorming with customers for fall gift projects, playing with a new soaping oil, and the youngsters off of school.  Please forgive me for the less frequent postings in these summer months but I’m hoping that we’ll all be happy with the pay off here soon!  We’ve got quite a few varieties working their way off the curing racks and some great ideas for the soaps to be whipped up next.  Yes, Herbert, even another round of beer soap with your name on it!

I’ve been asked a few times about how we make our laundry soap around here so I’m hoping to make someone’s day today.  Ours is pretty simple and you are welcome to whip up some of your own!  I just checked on my soap shreds again so I could snap a picture or two for you and placed them back onto the drying racks.  They should be ready to mix up by tomorrow.

I start by making a plain 100% coconut or lard soap, depending on what I’m looking for in the final mix.  After it has been soaped up and molded for 24 hours, I pop the soap out of the mold and cut it into large bars.  The bars rest for anywhere from 24 hours to three days before I shred them down.  I find the younger the soap, the easier it shreds.  These shreds go back on the rack for one to three days to dry out a bit more.  Once they’re where I want them, they get tossed into the soaping mixer and go for a quick spin.   (I learned from personal experience to keep a separate blender and mixer for soap stuff- soap still doesn’t taste good!)  The soap shreds get washing soda and borax mixed in; that’s it, unless you add a little fragrance when mixing it all together.  Everything gets placed into a bucket that sits on the washing machine.  How easy can you get, right?  It only takes us about a teaspoon to tablespoon to wash up our clothes- even the very muddy ones my kids have brought to me lately.  Do you have a favorite way to make your laundry soap or have you even tried before?  It was kind of intimidating at first, like soapmaking, but it’s a lot of fun!

Happy Washing!

Dorothy